Pieter Rijlaarsdam
Read all my blogsLast week I posted an article about how to import WSDL files (WebService Definitions) into SAP.
This was done in SE80 ->edit object -> Tab ‘Enterprise Services’ -> Client Proxy.
The result is a generated proxyclass. Today we are going to take a look at this proxy class and see how this can be used in ABAP coding, resulting in calling the functions from the webservice.
Proxy definition
The easiest way to look at the proxy from an abap viewpoint is to open the client proxy definition in SE80, and looking at the tab ‘Internal View’. This shows the definition from the SAP side of the webservice. As mentioned in the previous post, importing the WSDL in SAP results in the generation of a class with methods similar to the functions of the webservice. Also, data structures will be generated needed for the webservice to function.
If we look at the ‘OrderService’ as an example, we can see the proxy class name in the top of the hierarchy. This class contains methods similar to the methods in the WSDL.
Calling the webservice in ABAP
In order to call the webservice from ABAP, you just need create the class and call the method. There is one more thing you need to do concerning the ‘logical port’, but I will explain this later.
For you readers who are not familiar with object oriented abap, I will add some example code to instantiate the class and call the method. You will notice that I have also added the catching of an exception. If the WSDL is properly programmed, the proxyclass should also contain an exception class. You can use this class to retrieve any errors in case problems occur in the called system.
* Defining the object
DATA: lr_orderservice TYPE REF TO <your proxy class>,
lr_exception TYPE REF TO <your exception class>.
* Defining the communication structures
DATA: ls_create_order_request TYPE <the request structure of the method>,
ls_create_order_response TYPE <the response structure of your method>,
TRY.
* Creating the object
CREATE OBJECT lr_orderservice
EXPORTING
logical_port_name = ‘<your logical port>’.
* Calling the method
CALL METHOD lr_orderservice->create_order
EXPORTING
create_order_request = ls_create_order_request
IMPORTING
create_order_response = ls_create_order_response.
* Catching exceptions
CATCH <your exception class> INTO lr_exception.
ENDTRY.
In the example coding, the data that is transferred to the webservice is contained in the ls_create_order_request. Of course, to make the interface work, you should make sure that the data structure inside this filled properly. In some cases, the WSDL will help you by telling that some fields are obligatory, but not always. Also, the syntax check does not help you on this. Make sure you have the webservice documentation at hand.
Logical Ports
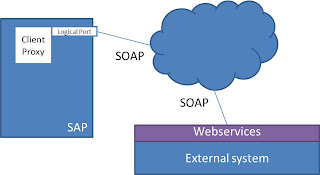
In the example code, when instantiating the proxy class, I mention exporting the logical port. The logical port determines the place where the webservice is called. Basically, this would be the URL and port from the WSDL.
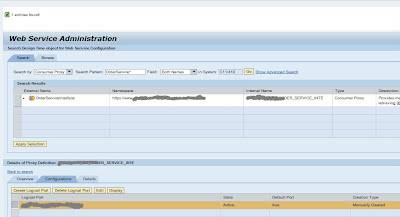
The logical port is key in the functioning of the webservice, and is maintained in the soamanager.
For those of you not familiar with the SOAManager (SOA being Service Oriented Architecture), soamanager is a webdynpro application that can be started using transaction SOAMANAGER. Note that a webbrowser session will be started. Welcome to SOAMANAGER.
 Here, select the option ‘Consumer Proxy’ and search for your client proxy. Note that the third field allows you to also search on ‘both names’. This might make it easier.


4 responses to “Using client proxies in ABAP coding”
Hi Pieter,
great Blog! One thing: You should always define lr_orderservice as a global varaint; because instanciating the port too often could cause bad performance and short dumps…
Cheers
Christian
Good tip Christian, Thanks :-).
Good Blog,Thanks
Nurhan
Very amazing and useful list of proxies.It will help me a lot.Thanks for sharing it.
Akinator UK proxy