Arjan Nieuwenhuizen
Read all my blogsHow to create an app that consumes an SAP NW Gateway service using SAP’s Appbuilder
Two weeks ago, SAP released their AppBuilder. The SAP AppBuilder is a tool that lets you create mobile apps based on the mobile SAPUI5 SDK. The best feature of the AppBuilder is that it is a WYSIWYG (what is you see is what you get) editor and you can create apps without writing a single line of code. In this weeks blog I will show you how to create a basic application using a sample Gateway service from SAP.
Intro
When SAP released the AppBuilder, I was eager to check it out and immediately started doing some tutorials. I was disappointed however, that the only examples I found that actually consume a real service, were using the Northwind sample OData service. Of course this is fine to learn the basic principles of the AppBuilder, but the Northwind service does not have the limitations that normal / actual SAP Netweaver Gateway services have (namely that access allow origin problems you always encounter when doing web development). Northwind has the famous Access-Control-Allow-Origin: * http header parameter set, so that you never have any issues doing cross domain http requests.
So the next step for me was to figure out how to connect the AppBuilder to an actual SAP NW Gateway service. I got it to work, the rest of the blog describes step by step how to do this yourself.
If you want to recreate this application, then you have to download the AppBuilder here & install it. I’m not going to list all the steps here, I did the installation by following the steps listed here. Installation is pretty straightforward.
Step 1: Register yourself for the SAP Demo Gateway services here.
In the app I am creating, I want to show a list of business partners, the service I want to use is https://sapes1.sapdevcenter.com/sap/opu/odata/sap/ZGWSAMPLE_SRV/BusinessPartnerCollection. To register, follow the steps described online to register yourself to use the SAP Demo Gateway services. After registration, you will be sent username/password that you can use to consume the sample gateway service.
Step 2: Install a local apache web server.
The local apache webserver will be used as a proxy. As described in the help section here, you need to set up a proxy to be able to access gateway services running on the internet. I always use XAMPP when I need an Apache server, but there are other options as well.
Step 3: Edit apache httpd.conf
In the httpd.conf file, make sure the proxy modules are enabled/uncommented:
LoadModule proxy_module modules/mod_proxy.so
LoadModule proxy_http_module modules/mod_proxy_http.so
And set up the proxy for the demo url:
SSLProxyEngine On
RequestHeader set Front-End-Https “On”
ProxyPass /sapgw/ https://sapes1.sapdevcenter.com/
ProxyPassReverse /sapgw/ https://sapes1.sapdevcenter.com/
Step 4: Save and (re)start Apache.
Save the httpd.conf file and restart your apache server.
Step 5: Test the url/proxy
Goto the following url in your browser, you will be prompted to enter your credentials, please use the ones that were send to you after you registered for the SAP Demo Gateway services.
http://localhost/sapgw/sap/opu/odata/sap/ZGWSAMPLE_SRV/BusinessPartnerCollection
If all is well you should be able to see the results:
Step 6: Configure AppBuilder to use the proxy: edit ide.json
In the directory <<appbuilder install dir>>ares-project there is a file called ide.json. We have to specify our proxy server there:
“httpProxy”: {
“host”:”localhost”,
“port”:80,
“upBase64″:””,
“user”:””,
“password”:”,
}
Step 7: Start AppBuilder
Navigate to the directory were you installed AppBuilder, on windows you can start it by executing run.bat. On MacOSX you run it by executing the rommand ./run.sh in the terminal. If all is well, your browser is automatically started on the location were the AppBuilder is running:
Step 8: Create a new project
Create a new project by clicking the new button on the bottom. Give your project a name, make it a phone based application and choose generic application as a template.
Step 9: Create a new datasource.
On the left of the editor screen, you can see a section for datasources (you have to click it open). Select the OData Service node and click the new icon to create a new one an enter the following info:
Name: SAP
URL: /sapgw/sap/opu/odata/sap/ZGWSAMPLE_SRV/
Username: <<your demo username>>
Password: <<your demo password>>
Deselect “Use jsonp”
Make sure you select the Web server proxy option.
If all goes well, AppBuilder queries the service and discovers what’s in the service. You can open the newly added datasource by clicking on the icon on the left to see what type of information can be retrieved with this service.
Step 10: Create a SuperList (metadata file)
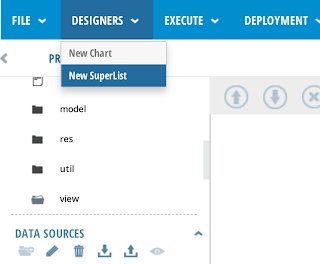
Now from the Designers menu, click to option to create a new SuperList:
Enter the following info on the create new superlist popup:
Filename: businesspartners.slmeta
View Name: MainView
View Style: ListView
Click confirm to create the SuperList. Once created, click the data structure icon on the left, in the popup, first click the icon next to the data source field:
Clicking the dots icon will open a second popup. Select the BusinessPartnerCollection (located under the SAP datasource) as the data structure for this super list metadata file.
The AppBuilder automatically recognises all the fields in the BusinessPartner structure, lets delete all of the except for the CustomerName field and the City field:
Click confirm to finish the data structure binding.
Step 11: Design the SuperList
Once the SuperList metadata file is created, we can start designing it. The designer for the SuperList metadata file should already be open. On the left, select the toolbox and drag and drop a label inside the design view. Keep the label selected and click the icon next to the text property on the right. Change the default text ‘Label’ to CompanyName (this binds the value to the property CompanyName).
Repeat this process for the City field. Drag and drop another label onto the design view, and bind its value to the City property by following the steps you did for the CompanyName field. Your final design should look like this:
Your done, the SuperList metadata file is finished.
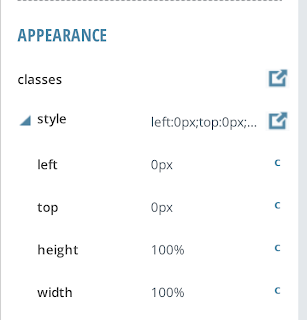
Step 12: Add a SuperList to your UI.
Top: 0
Left: 0
Width: 100%
Height: 100%


4 responses to “How to create an app that consumes an SAP NW Gateway service using SAP’s Appbuilder”
Thanks. Helped a lot.
Nice Blog. I am facing an issue send data from my AppBuilder to SAP Gateway. I have input fields on my front end – Now I need to send these fields data to my gateway system using odata service. When I try to create a datasource and give the gateway service URL, I always get error. Appreciate if you could help how to send the data to backend sap
How can we run the sap AppBuilder application on a REAL mobile device? using apache cordova
Thanks for finding this out. I tested