
Olaf Pohlmann
Read all my blogs
This week we’re doing a follow up of an earlier blog Implementing a change in SAP Cloud for Customer and we want to show another way to enhance the Cloud for Customer system. Besides the options available in the “Key User Tool” (nicely described in Customer onDemand – Part 3) several additional options are offered by the Software Development Kit (SDK) for Cloud for Customer called SAP Cloud Applications Studio. This additional software package is installed on your local (Windows) machine and provides a development environment based on Microsoft Visual Studio.
At Acorel we are currently implementing Cloud for Customer for our own organization and this provides a good opportunity to show a real-life example of how we enhanced the system using this SDK.
The requirement: for an opportunity it must be possible to specify different categories of expertise and to specify a distribution in percentages. So for example an opportunity involves 50% CRM on-Premise and 50% Cloud expertise. The system should calculate the value per category as fraction of the total expected value. And it must be possible to search for the categories as well.
Adding the business logic
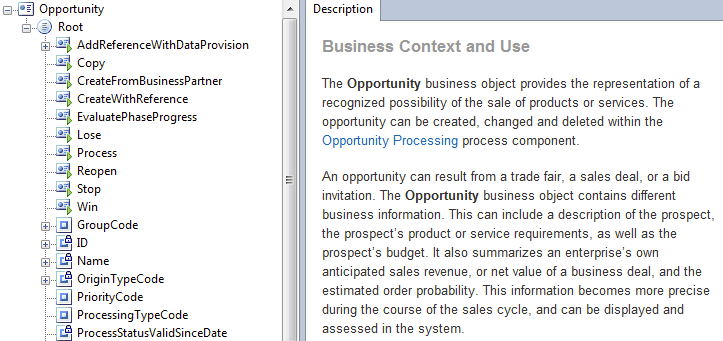
The Cloud for Customer system contains, like the CRM on-Premise system, an application layer consisting of business objects such as activity, customer and material. You can use the Repository Explorer in the SDK to browse through all objects and look at its definition. For our purpose we need the opportunity:
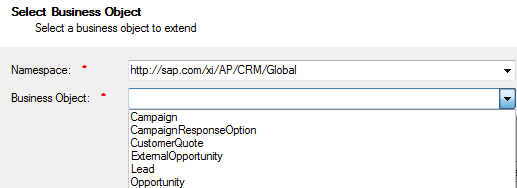
First we need to create a Customer-Specific Solution to hold our developments. Next step is to add a Business Object Extension to this solution. In the wizard you select the object you wish to extend:
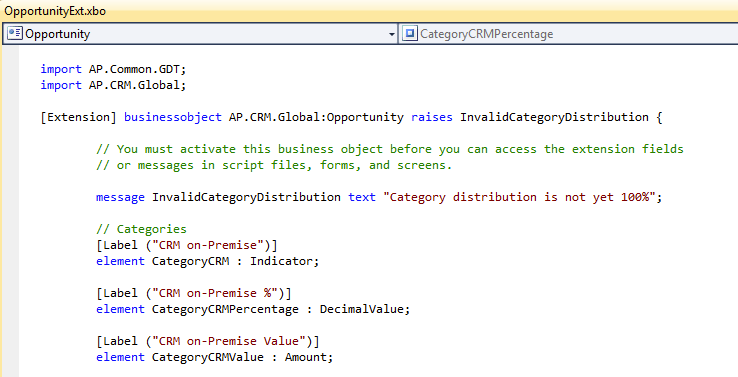
When the wizard finishes it shows an editor where you make the necessary extensions. We need a couple of elements to store the categories, percentages and value per category.
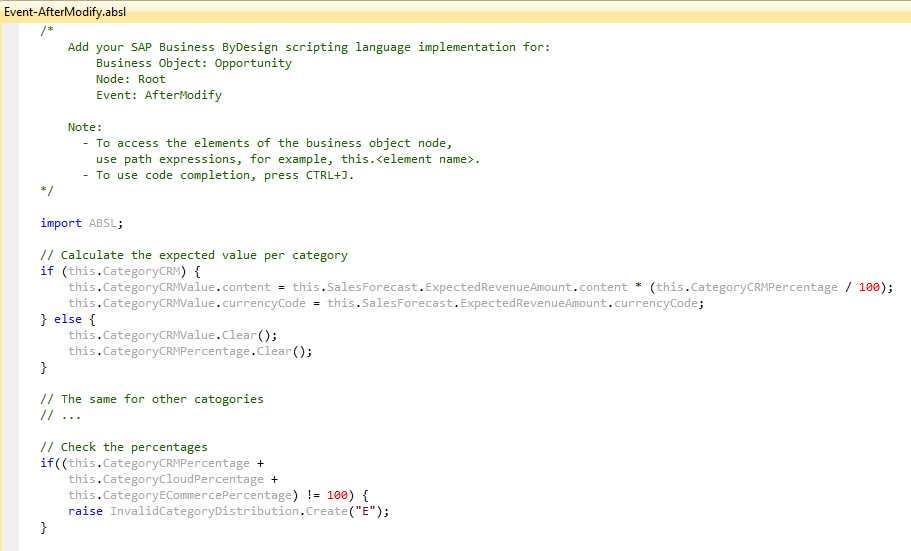
The calculation of expected value per category is done in a Script File. To create one choose “Create Script Files” from the context menu of the Business Object Extension and select the AfterModify-event (there is also a BeforeSave-event). The file that’s created offers a good place for checks and calculations.
The user interface
Now that we have the business logic in place it’s time to create an user interface. We want to have the extra fields on a new tab in the opportunity overview screen and to do this we need to create an Embedded Component by using the “Add New Item” button.
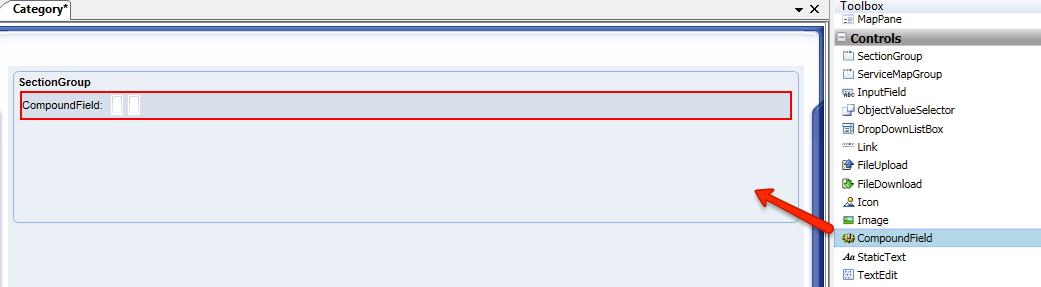
Once created, double-click on this component to navigate to the UI Designer. Start by dragging a CompoundField from the Toolbox to the Designer canvas.

Once created, double-click on this component to navigate to the UI Designer. Start by dragging a CompoundField from the Toolbox to the Designer canvas.
The CompoundField allows grouping of multiple elements on one line. The first line is for the CRM on-Premise category so the label is changed accordingly. Now change the included fields to the following:
- Field “Indicator”: Set DisplayType to Checkbox and link the value to field CategoryCRM in the BO Browser
- Field “Percentage”: Link the value to field CategoryCRMPercentage
- Field “Value”: Set ReadOnly to true and link the Value to CategoryCRMValue
To have the percentage field show the %-sign as well, go to the DataModel tab, find the CategoryCRMPercentage field and change the CCTS Type to “percent”. Repeat these steps for the other fields as well and the result in the Designer tab will look like:
What we have now is a stand-alone screen with no interaction whatsoever with the standard opportunity overview screen. One way to link the two screens is by connecting an so-called outport of the embedding screen to an inport of the embedded component. How to create such an inport is described in detail by Jens Limbach in his answer on this question posted on SCN.
Embedding our UI in the standard screen
Let’s create the new tab. To find out which screen to enhance you can go to the Configuration Explorer in the UI Designer and navigate to: BYD_COD » SalesOnDemand » Opportunity » UI. In our case the relevant screen is COD_Opportunity_TI.
Go back to the Cloud Applications Studio, select the business object extension and choose “Enhance Screen” from the context menu and select screen COD_Opportunity_TI. Open the Extensibility Explorer, find the entity called “Undefined” and select “Add View with embedded Component” to include our own component. Use the Bind-button to link the standard outport to our inport. The whole procedure is described in much more detail in chapter “Step 3: Extend Opportunity with new Tab” on page 51 in SDK_Tutorial.docx (see also document Cloud for Customer CustomBO Advanced Tutorial on SCN).
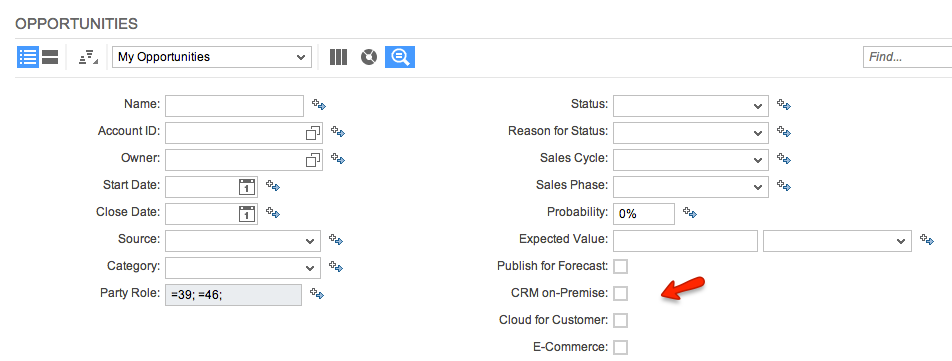
Et voilà, our new tab on the overview screen:

A pretty cool feature is that this tab is directly active on the iPad as well without any additional development effort:

The search screen
Getting the categories on the advanced search screen is a simple matter of adding the extension fields to screen COD_Opportunity_SADL. The end result is shown below.
That’s pretty much it. The opportunity contains the required fields, we have the business logic in place and we can search the way we want.
Stay tuned for more cloud (development) news.

Receive our weekly blog by email?
Subscribe here:


2 responses to “Extending Cloud for Customer using the SDK”
Hi Thanks for this nice blog. It's very helpful. Actually I have a similar kind of requirement in which I want to sum up the Expected values of all the won opportunities corresponding to a particular account then categorizing the account as A B C category based on the rage of total calculated expected values. Is it possible to do this?
Plz. help it's very urgent I can't find any help to do this.
Thanks!
Saurabh
Hi Saurabh, it might be possible but it's complicated. In order to get this working you need to trigger somehow the (re-)calculation and determination whenever an opportunity is being created, modified or deleted and store the result on yet another entity, the account. Complex. But I would be surprised if you cannot achieve the same with the standard reporting functionality. You can also make enhancements in this area, see e.g. http://blog.acorel.nl/2015/07/how-to-customise-standard-report-in-c4c.html