
Roelof Albers
Read all my blogs2017 is about to start, and all we hear at SAP TechEd is HANA, Big Data, UX design and Fiori.
All great, all nice, but how can we benefit from all these innovations quickly without the big investments of moving to S/4HANA, HCP, IoT and HANA analysis.
What if we want to leverage the Fiori user interface to create a ‘delightful user experience’, with our current backend.

All you need is a SAP Netweaver stack with SAP Gateway (standard component in recent SAP netweaver releases), a HCP (Web IDE) account, this 3 step tutorial and some development skills.
Let’s take a look.
When developing Fiori apps, the SAP Web IDE is the way to go. You can find more information about the Web IDE here.

Since the Web IDE is running on Hana Cloud Platform, we assume you have an account (either trial or for real) for that.
Install and Configure the SAP HANA Cloud Connector
Is your Gateway available through the internet? Skip this step and continue to step 2.
To make communication available between the SAP Web IDE and your Gateway, you will need to install the SAP HANA Cloud Connector. The SAP HANA Cloud Connector acts as a reverse invoke proxy between the on-premise network and SAP HANA Cloud Platform.
You can download the SAP HANA Cloud Connector here (prerequisites and installation instructions can be found here ).
After the installation, make sure to start the Cloud Connector via the bat file (Windows) or sh file (Mac) in the Cloud Connector folder.

Now open the URL: https://localhost:8443/
Ignore the error message of in insecure connection via the Advanced option.
You can login with the following details.

Assuming that this is the first time installing/running the Cloud Connector. When asked for the installation type you should choose Master. In the next step you can change the initial password.
Set up the initial configuration, this is the connection to your Hana Cloud Platform.
Landscape Host: hanatrial.ondemand.com
Account Name: SXXXXXXtrial
Account User: SXXXXXX
Password: Your SCN password
Once the connection to HCP is correct, continue with the mapping to the SAP Gateway. In Access Control you need to add the connection to your SAP Gateway.

Depending on your network, choose HTTP or HTTPS. In the next step you will need to fill in the internal server name and port of your SAP system.

Next you should fill the virtual name of your SAP system which we will use in HCP. This name can be whatever you like.

Save the mapping and continue by adding resources. For developing SAPUI5 apps you will need the following resources.
• /sap/bc/adt (dev_abap)
• /sap/bc/ui5_ui5 (ui5_execute_abap)
• /sap/opu/odata (odata_abap)

Your Cloud Connector Configuration is done.
Set up the connection in SAP Hana Cloud Platform
Open your HCP Cockpit: https://account.hanatrial.ondemand.com
If you are using the Cloud Connector check the folder Connectivity -> Cloud Connectors if everything is running correct.

Next we need to make a new destination to your virtual host. This destination will be used by the Web IDE. Press new Destination, and fill the following data.
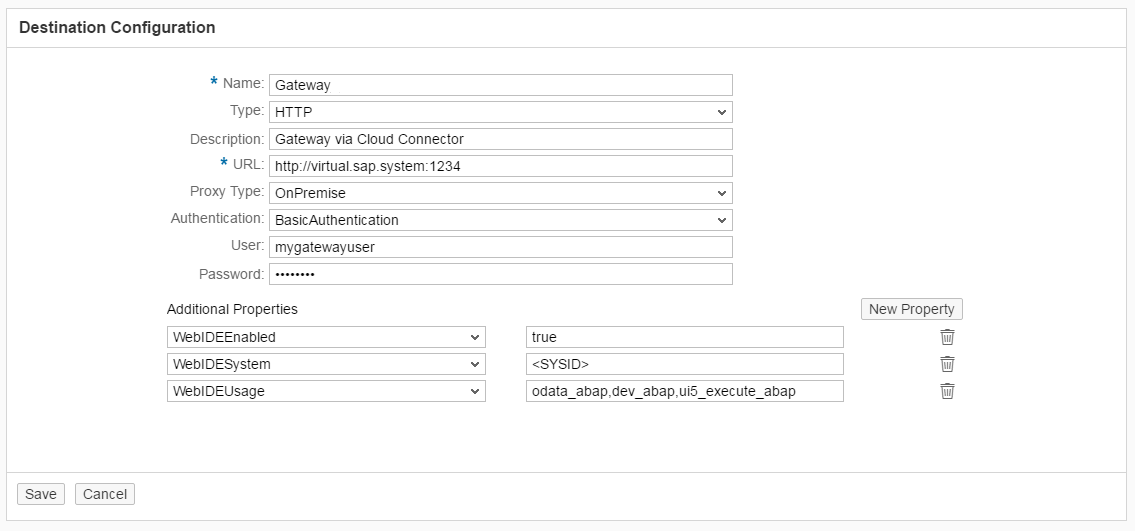
The values in WebIDEUsage (odata_abap,dev_abap,ui5_execute_abap) are taken from the resources filled in the Cloud Connector.
If you are not using the Cloud Connector, you can use the original URL for the Gateway (not the virtual) and change the Proxy Type to Internet.
Once the connection is set up successful, continue to step 3.
Create a new SAPUI5 Fiori Application connected to your Gateway
Now you have set up the complete configuration, you can finally create a new SAPUI5 project using a OData service on your Gateway. Open your Web IDE and choose the option New Project from Template.

Choose SAP Fiori Worklist Application.

Next select your Destination and the Gateway Service you would like to use.

Choose the EntitySet you would like to bind and press Finish.

Your SAPUI5 application is created. Select your application and press Run (Alt-F5).

If your OData service returns data, you will see a basic SAPUI5 app like below.

Happy coding!
Receive our weekly blog by email?
Subscribe here:


