
Sait Gun
Read all my blogsSolving SAP Cloud Integration’s Logging Problem with Custom Adapters
Sait Gun, 31 May 2023
The Logging Problem
Observing how an application behaves at runtime is crucial in software development. Although we have smart IDEs, compilers, and tools that help us develop solutions for our clients, the help of these tools stops when we run the solution on a different environment than our own machine/IDE. Fortunately, there are tools that can help us observe and monitor our solutions while they are running, such as the Elk stack, Grafana stack, or simply logging into a file.
However, these observability solutions do not have a unified protocol. Therefore, developers often have to implement or adapt their own solutions to work with a particular stack. In other words, developers must choose one observability platform at the beginning of the software development lifecycle and are locked into that platform. Like all solutions, there is no one great product that solves all problems, and all solutions have trade-offs. Because of this, it is almost impossible to judge the observability capabilities of a solution.
The good news is that this lack of a unified protocol has been addressed by open-source communities with projects such as OpenTelemetry and SLF4J. However, it may take some time for these projects to become adapted and recognized as the de facto standard, like Docker and Kubernetes.
At Acorel, like many SAP partners, we use the SAP Cloud Integration (SAP IS I) to add value to our clients’ business processes. SAP CI provides many crucial monitoring capabilities out of the box. For example, it’s easy to determine how many messages failed in an iFlow in the last hour. Additionally, it’s possible to look into the iFlow’s execution steps in detail with tracing. While the tracing capabilities in SAP CI are excellent, it’s not easy to say the same for the retention of trace data. Traces must always be enabled beforehand, and trace data is only stored in the system for an hour. These restrictions are not helpful when you need to determine why a mission-critical iFlow is behaving unexpectedly in production. There are a couple of methods to overcome this, such as:
- Logging with message processing log in a Groovy script is a simple method that allows you to log almost any piece of information. However, solely relying on this method is almost impossible due to some drawbacks. The first drawback is that, since this method is easy and flexible, it’s difficult to define a project-wide logging standard. While it’s technically possible to use script collections, the code required for logging and iFlow-specific code is tightly coupled, making centralized log management difficult. The second drawback is that there is a technical limitation on how much data can be logged in a given day, which is currently set at 1GB.
- Logging to a data store or a JMS queue is a relatively easy method to set up. However, when using this method, you need to send a message class to the target, and it requires a couple more clicks to view the stored message. If you want to log a specific text or anything other than the current message, you need to manipulate the message, which can lead to unwanted side effects. Additionally, this method has technical limitations, namely a maximum storage capacity of 32GB for the data store option and 9.3GB for the message queue option.
- External Logging: This method is fairly new, and its documentation and capabilities are not well defined. Based on the existing documentation, this feature allows for sending and storing message processing logs in external systems. It appears that this feature was implemented to help customers overcome the 1 GB size limitation of message logs. However, this option does not help with creating a unified logging layer.
All of the above methods have pros and cons, however, none of the methods truly allows a unified logging layer.
A New Method
In this blog, I will introduce a new method for logging in iFlows that aims to provide a unified logging layer. While existing methods have their pros and cons, none of them truly offer a comprehensive solution.
To address this gap, we can leverage the custom adapter development capability of the SAP CI (Cloud Integration) platform to create a logging layer. This will provide an easy and functional way to log data within an iFlow, with the flexibility to modify implementation details and storage location for logging.
For this blog’s Proof of Concept (PoC), we will focus on delivering a custom adapter specifically designed for integration developers to log messages to the message processing logs. The objective is to enable the logging of the message body, headers, and properties in the same log message, without requiring developers to write any code.
To achieve this, we can follow these steps:
1. Prerequisites are detailed in the official documentation SAP Cloud Integration adapter development prerequisites . Basically, you need to have Java 8 and Maven installed on your local machine.
2. Use the below maven command to create a new adapter project. Change the Component and Adapter parameters for your own use case.
[shell]
mvn archetype:generate -B \
-DarchetypeGroupId=com.sap.cloud.adk \
-DarchetypeArtifactId=com.sap.cloud.adk.archetype-adapter \
-DarchetypeVersion=1.0.1 \
-DcomponentName=CommonLogger \
-DadapterName=CommonLogger \
-DadapterId=ZCommonLogger \
-DadapterVendor=acorel \
-DadapterVersion=1.0.0 \
-Dscheme=acorel-log \
-DgroupId=nl.acorel.cpi.logger \
-DartifactId=CommonLogger \
-Dversion=1.0.0-SNAPSHOT
[/shell]
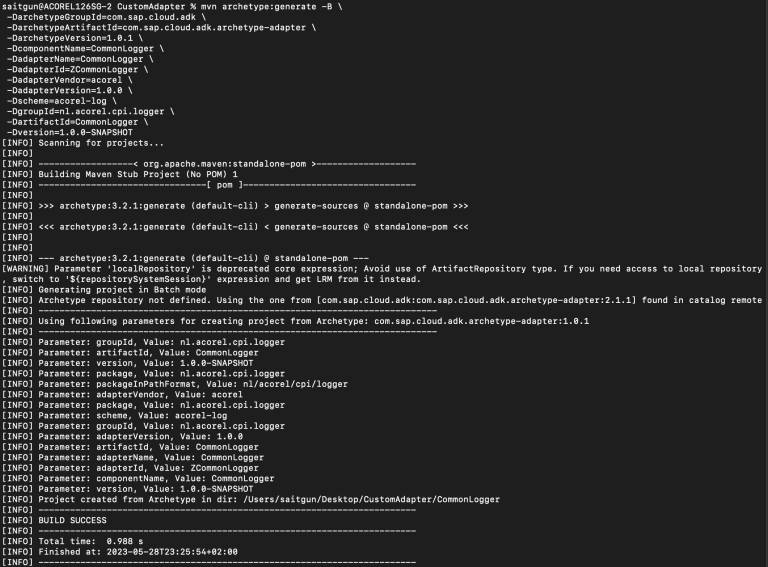
3. Once you executed the above command, you will see similar logs to the ones below.
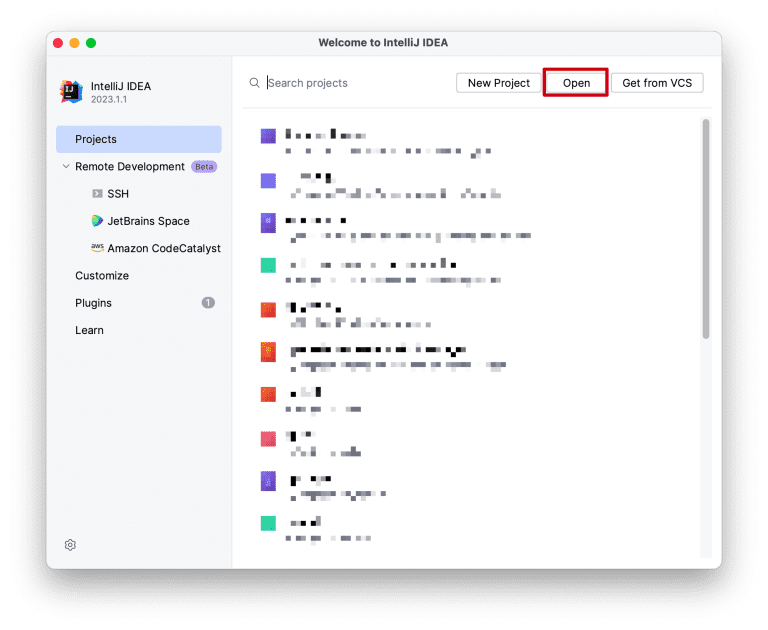
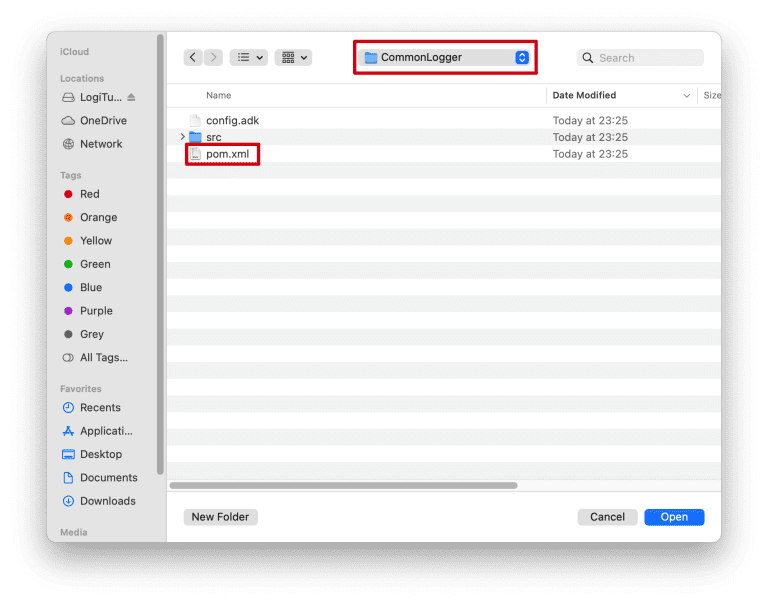
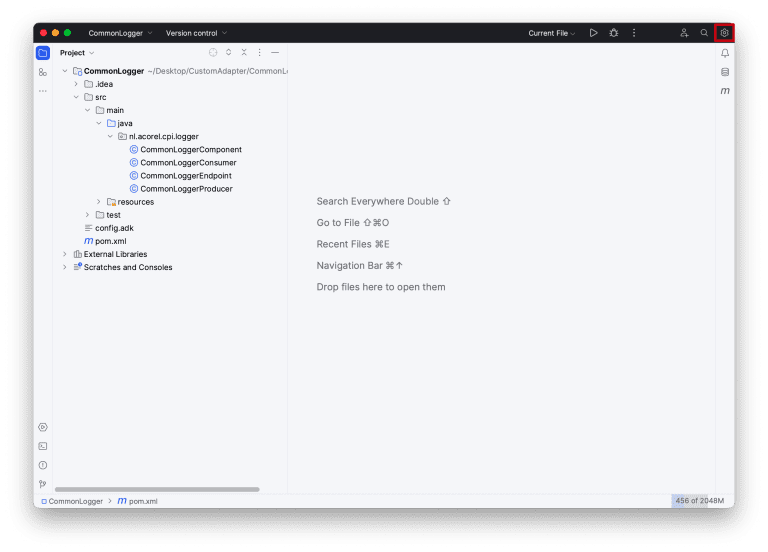
4. It’s time to open the project in our favorite IDE (mine is IntelliJ IDEA). Since this is a Maven project, I will choose the pom.xml file to open as a Maven project in IntelliJ.
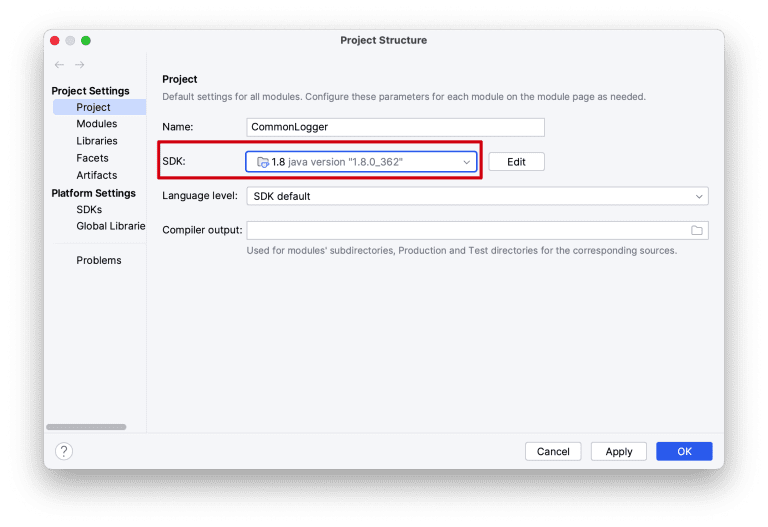
5. If you have multiple JDKs installed on your machine, you need to set the project JDK in the project structure as shown below.
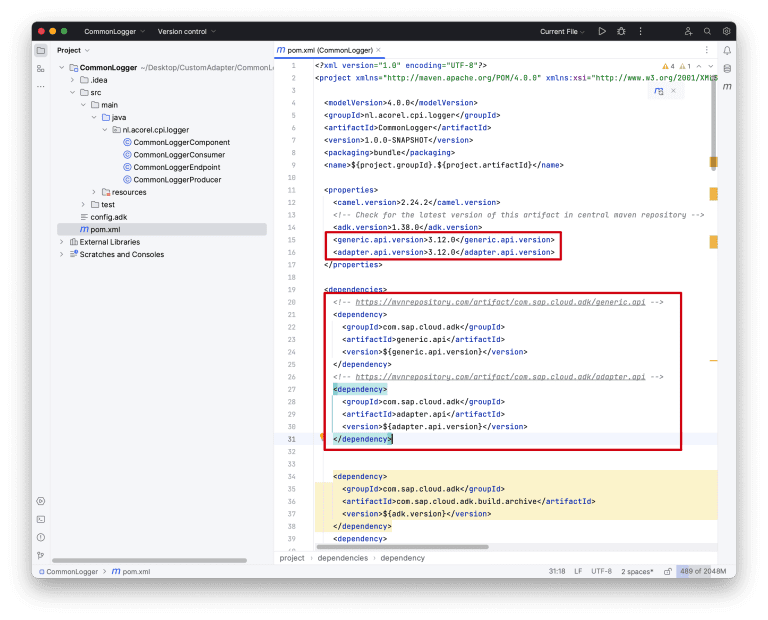
6. We need to include the dependencies for Generic API and Adapter API to access SAP CI internal services.
[xml]
<generic.api.version>3.12.0</generic.api.version>
<adapter.api.version>3.12.0</adapter.api.version>
<!– https://mvnrepository.com/artifact/com.sap.cloud.adk/generic.api –>
<dependency>
<groupId>com.sap.cloud.adk</groupId>
<artifactId>generic.api</artifactId>
<version>${generic.api.version}</version>
</dependency>
<!– https://mvnrepository.com/artifact/com.sap.cloud.adk/adapter.api –>
<dependency>
<groupId>com.sap.cloud.adk</groupId>
<artifactId>adapter.api</artifactId>
<version>${adapter.api.version}</version>
</dependency>
[/xml]
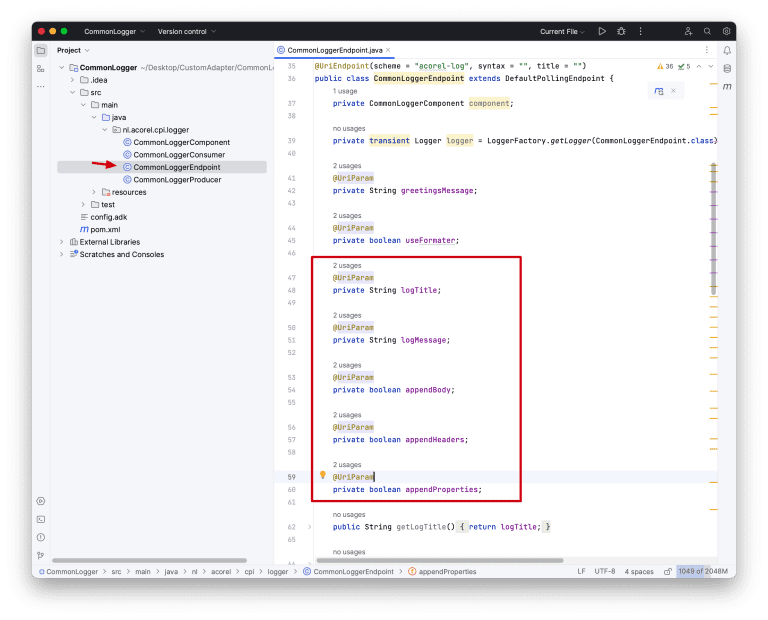
7. Now add the parameters that we would like to receive from the integration developer. Fields are defined in the *Endpoint Java class.
8. It’s time to implement the actual logic. We would like to store the logs in the message processing logs, however, you can easily implement your own log logic. Since we want to log in a request-reply, we need to implement the logic in the *Producer Java class’s process method.
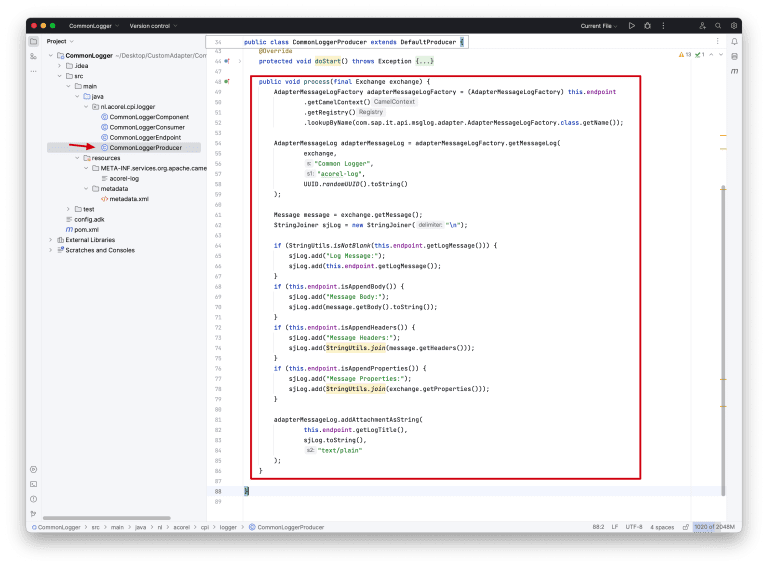
[java]
public void process(final Exchange exchange) {
AdapterMessageLogFactory adapterMessageLogFactory = (AdapterMessageLogFactory) this.endpoint
.getCamelContext()
.getRegistry()
.lookupByName(com.sap.it.api.msglog.adapter.AdapterMessageLogFactory.class.getName());
AdapterMessageLog adapterMessageLog = adapterMessageLogFactory.getMessageLog(
exchange,
"Common Logger",
"acorel-log",
UUID.randomUUID().toString()
);
Message message = exchange.getMessage();
StringJoiner sjLog = new StringJoiner("\n");
if (StringUtils.isNotBlank(this.endpoint.getLogMessage())) {
sjLog.add("Log Message:");
sjLog.add(this.endpoint.getLogMessage());
}
if (this.endpoint.isAppendBody()) {
sjLog.add("Message Body:");
sjLog.add(message.getBody().toString());
}
if (this.endpoint.isAppendHeaders()) {
sjLog.add("Message Headers:");
sjLog.add(StringUtils.join(message.getHeaders()));
}
if (this.endpoint.isAppendProperties()) {
sjLog.add("Message Properties:");
sjLog.add(StringUtils.join(exchange.getProperties()));
}
adapterMessageLog.addAttachmentAsString(
this.endpoint.getLogTitle(),
sjLog.toString(),
"text/plain"
);
}
[/java]
9. Now design the adapter’s configuration screen in iFlow. We need to define the newly created fields in the metadata XML file in AttributeMetadata tags.
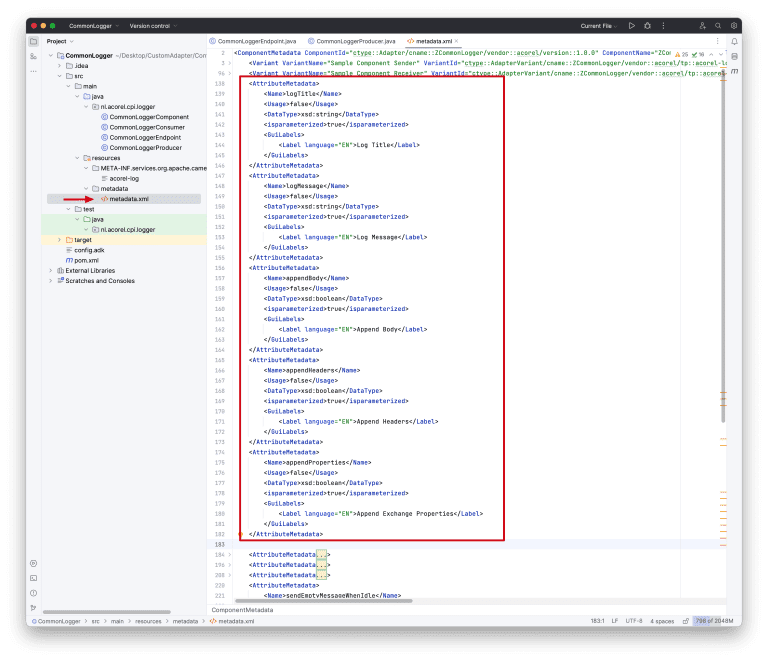
[xml]
<AttributeMetadata>
<Name>logTitle</Name>
<Usage>false</Usage>
<DataType>xsd:string</DataType>
<isparameterized>true</isparameterized>
<GuiLabels>
<Label language="EN">Log Title</Label>
</GuiLabels>
</AttributeMetadata>
<AttributeMetadata>
<Name>logMessage</Name>
<Usage>false</Usage>
<DataType>xsd:string</DataType>
<isparameterized>true</isparameterized>
<GuiLabels>
<Label language="EN">Log Message</Label>
</GuiLabels>
</AttributeMetadata>
<AttributeMetadata>
<Name>appendBody</Name>
<Usage>false</Usage>
<DataType>xsd:boolean</DataType>
<isparameterized>true</isparameterized>
<GuiLabels>
<Label language="EN">Append Body</Label>
</GuiLabels>
</AttributeMetadata>
<AttributeMetadata>
<Name>appendHeaders</Name>
<Usage>false</Usage>
<DataType>xsd:boolean</DataType>
<isparameterized>true</isparameterized>
<GuiLabels>
<Label language="EN">Append Headers</Label>
</GuiLabels>
</AttributeMetadata>
<AttributeMetadata>
<Name>appendProperties</Name>
<Usage>false</Usage>
<DataType>xsd:boolean</DataType>
<isparameterized>true</isparameterized>
<GuiLabels>
<Label language="EN">Append Exchange Properties</Label>
</GuiLabels>
</AttributeMetadata>
[/xml]
10. After defining the fields, we can start designing the configuration screen. The screens are defined in Variant tags. Since we want to use our adapter in request-reply, we will change the Receiver variant with our own definitions.
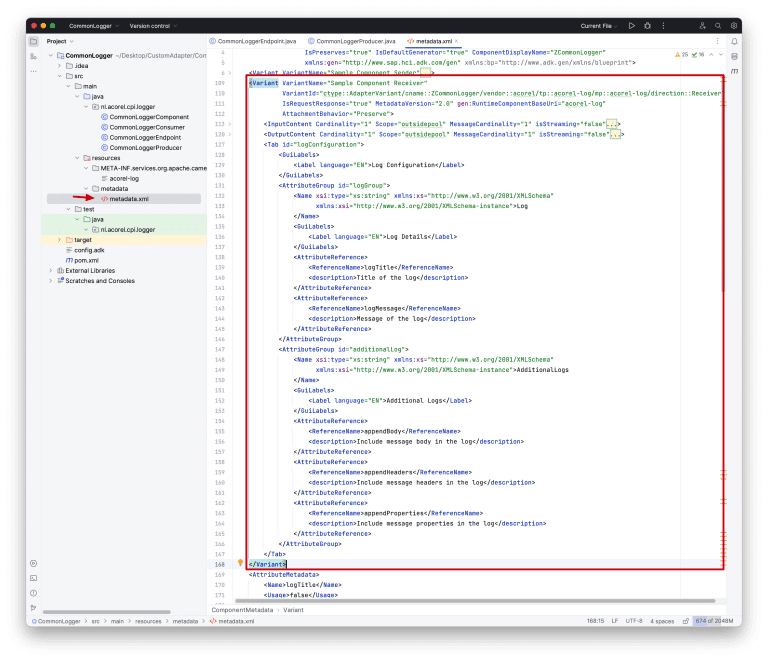
[xml]
<Variant VariantName="Sample Component Receiver"
VariantId="ctype::AdapterVariant/cname::ZCommonLogger/vendor::acorel/tp::acorel-log/mp::acorel-log/direction::Receiver"
IsRequestResponse="true" MetadataVersion="2.0" gen:RuntimeComponentBaseUri="acorel-log"
AttachmentBehavior="Preserve">
<InputContent Cardinality="1" Scope="outsidepool" MessageCardinality="1" isStreaming="false">
<Content>
<ContentType>Any</ContentType>
<Schema xsi:type="xs:string" xmlns:xs="http://www.w3.org/2001/XMLSchema"
xmlns:xsi="http://www.w3.org/2001/XMLSchema-instance"></Schema>
</Content>
</InputContent>
<OutputContent Cardinality="1" Scope="outsidepool" MessageCardinality="1" isStreaming="false">
<Content>
<ContentType>Any</ContentType>
<Schema xsi:type="xs:string" xmlns:xs="http://www.w3.org/2001/XMLSchema"
xmlns:xsi="http://www.w3.org/2001/XMLSchema-instance"></Schema>
</Content>
</OutputContent>
<Tab id="logConfiguration">
<GuiLabels>
<Label language="EN">Log Configuration</Label>
</GuiLabels>
<AttributeGroup id="logGroup">
<Name xsi:type="xs:string" xmlns:xs="http://www.w3.org/2001/XMLSchema"
xmlns:xsi="http://www.w3.org/2001/XMLSchema-instance">Log
</Name>
<GuiLabels>
<Label language="EN">Log Details</Label>
</GuiLabels>
<AttributeReference>
<ReferenceName>logTitle</ReferenceName>
<description>Title of the log</description>
</AttributeReference>
<AttributeReference>
<ReferenceName>logMessage</ReferenceName>
<description>Message of the log</description>
</AttributeReference>
</AttributeGroup>
<AttributeGroup id="additionalLog">
<Name xsi:type="xs:string" xmlns:xs="http://www.w3.org/2001/XMLSchema"
xmlns:xsi="http://www.w3.org/2001/XMLSchema-instance">AdditionalLogs
</Name>
<GuiLabels>
<Label language="EN">Additional Logs</Label>
</GuiLabels>
<AttributeReference>
<ReferenceName>appendBody</ReferenceName>
<description>Include message body in the log</description>
</AttributeReference>
<AttributeReference>
<ReferenceName>appendHeaders</ReferenceName>
<description>Include message headers in the log</description>
</AttributeReference>
<AttributeReference>
<ReferenceName>appendProperties</ReferenceName>
<description>Include message properties in the log</description>
</AttributeReference>
</AttributeGroup>
</Tab>
</Variant>
[/xml]
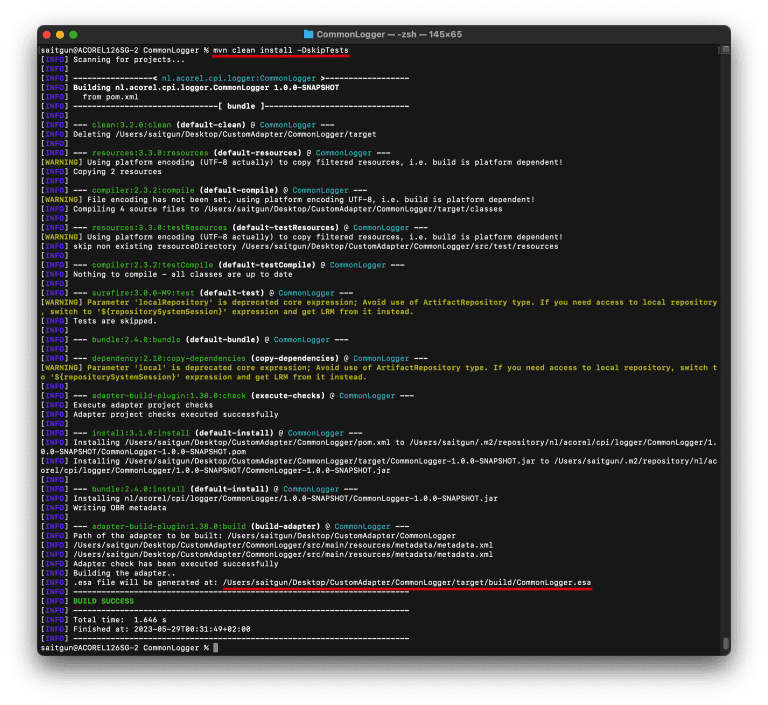
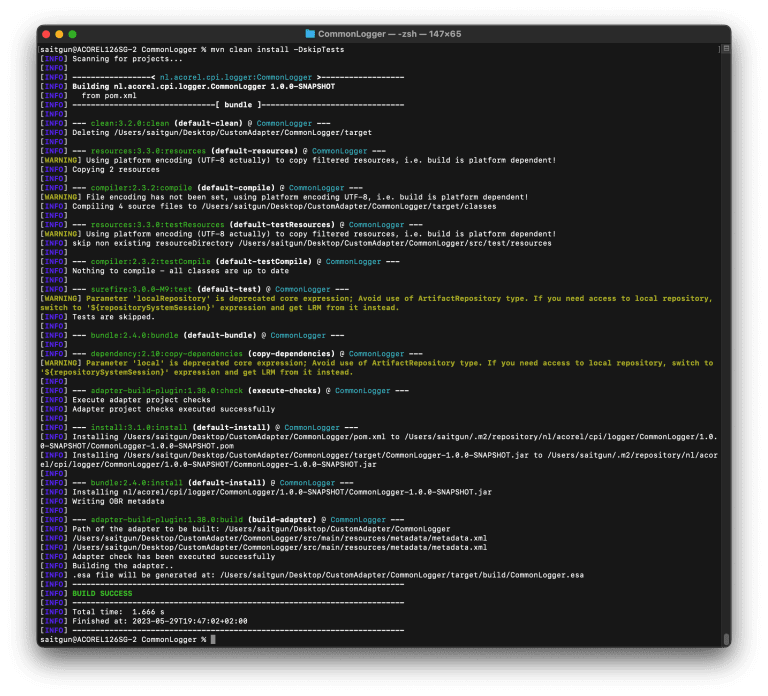
11. It seems that all logic and configurations have been completed for our custom adapter. Now, it’s time to build the esa file. To do this, we need to run “mvn clean install -Dskiptests” at the root of our project. The “-Dskiptests” flag is required for this proof of concept because we did not adapt the pre-delivered unit tests for our log logic, thus causing the tests to fail. Once the build has finished, you can locate the path of the esa file in the logs.
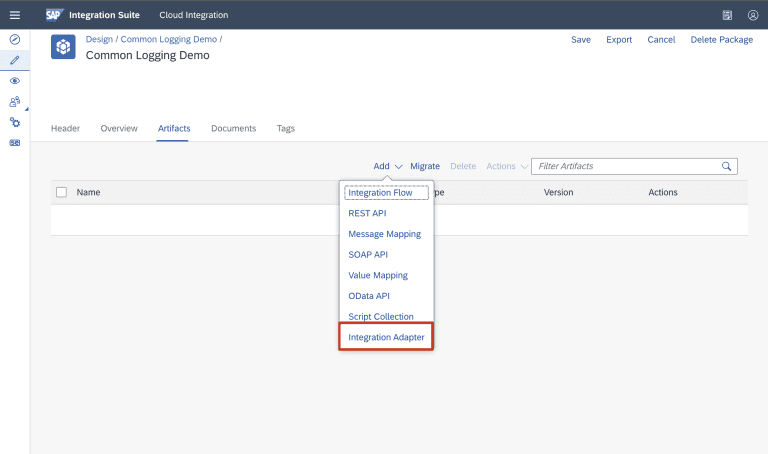
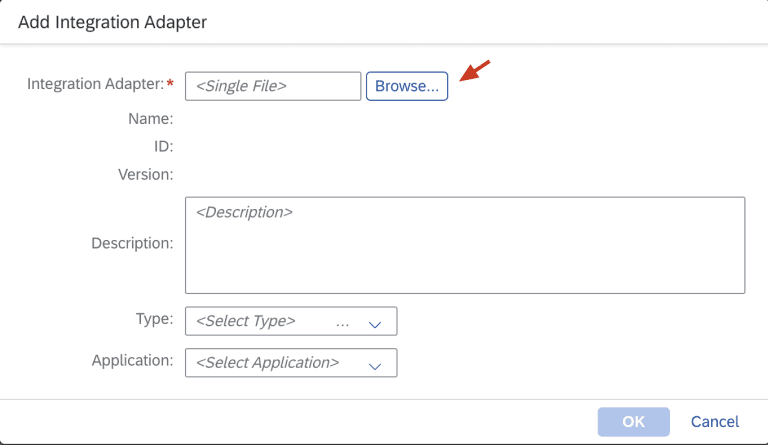
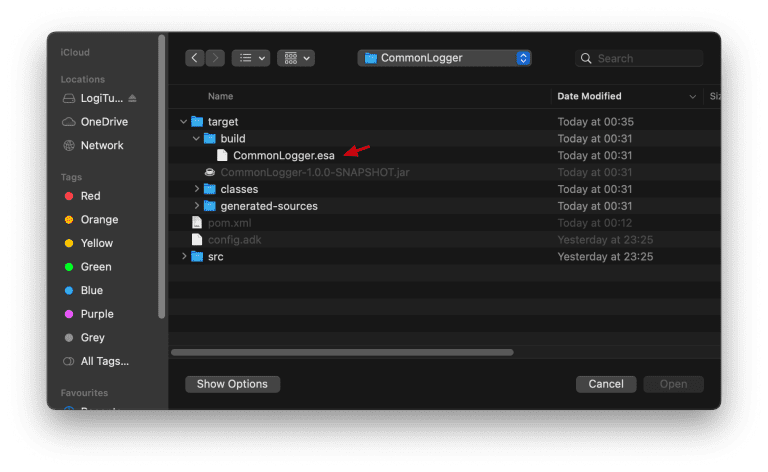
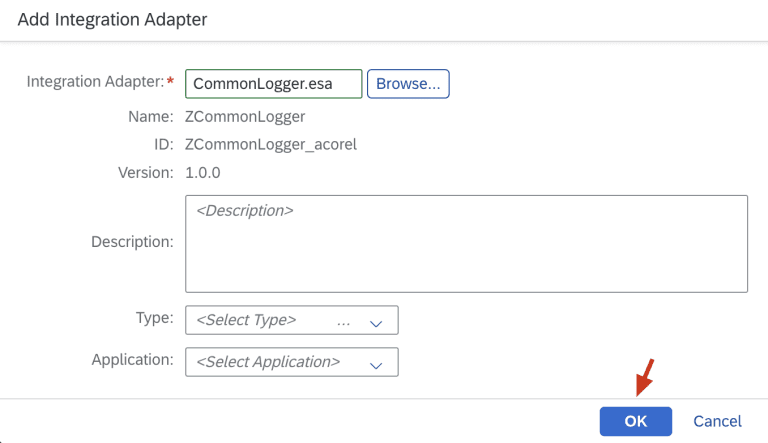
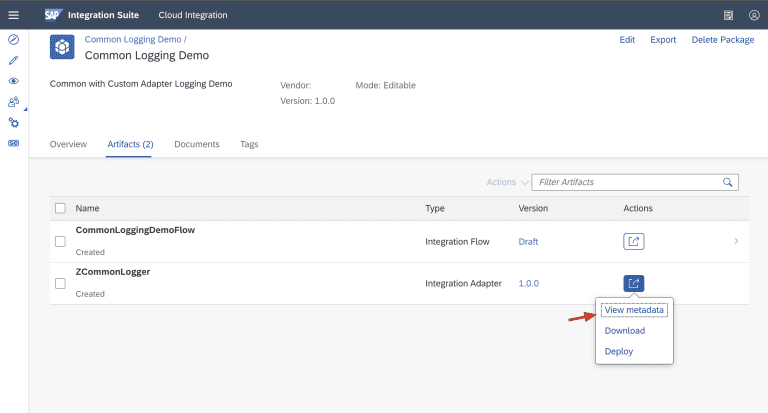
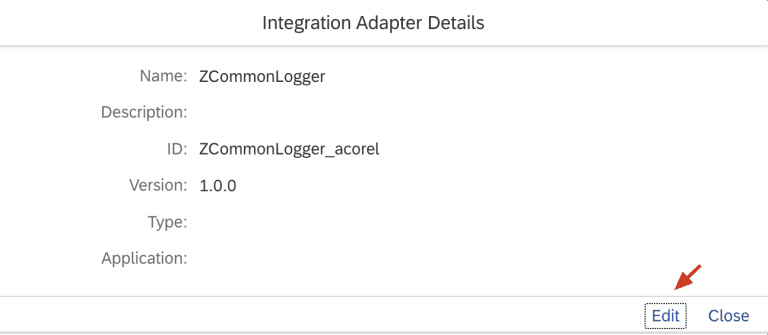
12. Import the adapter in SAP CI.
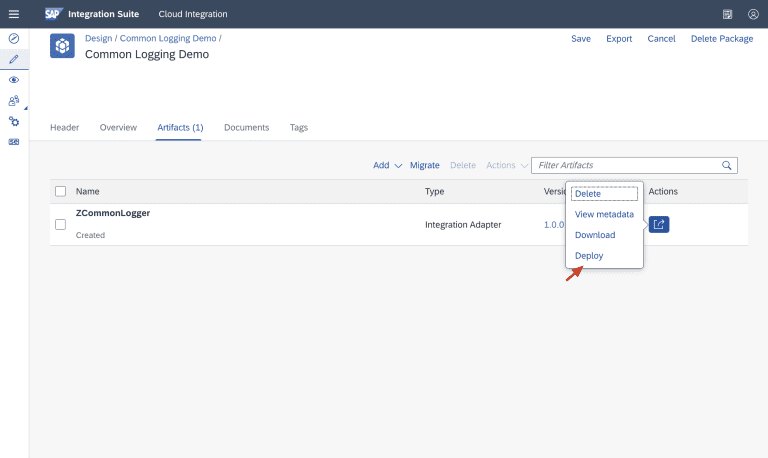
13. It’s important not to forget to deploy the adapter.
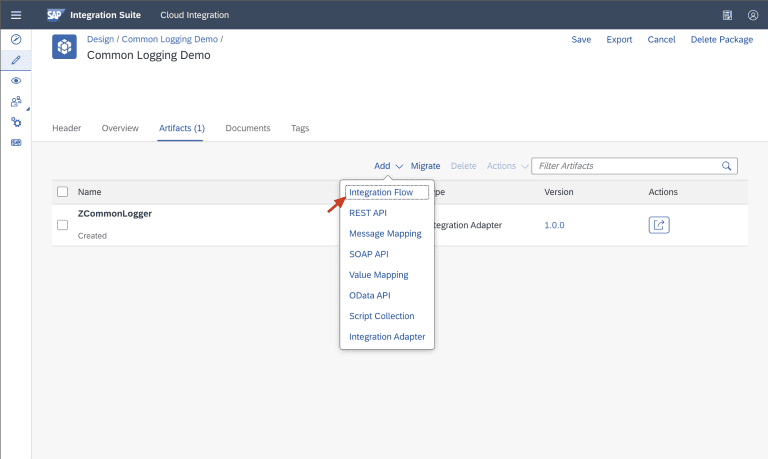
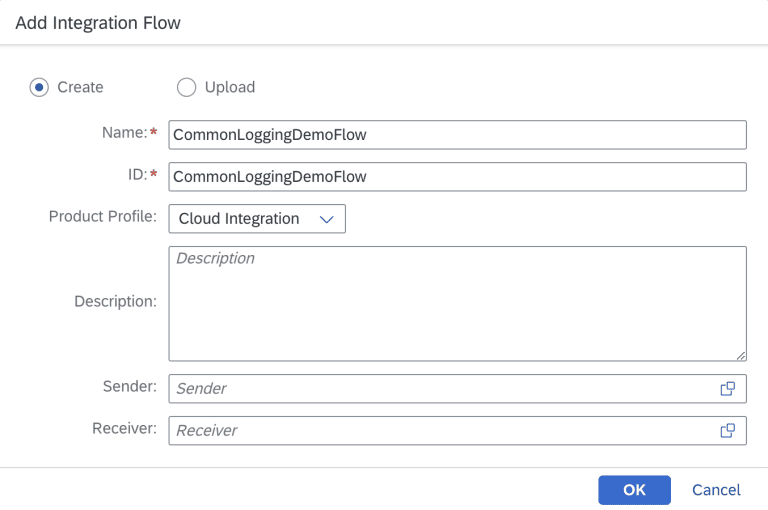
14. The adapter can now be used in iFlows. To test it, let’s create an iFlow.
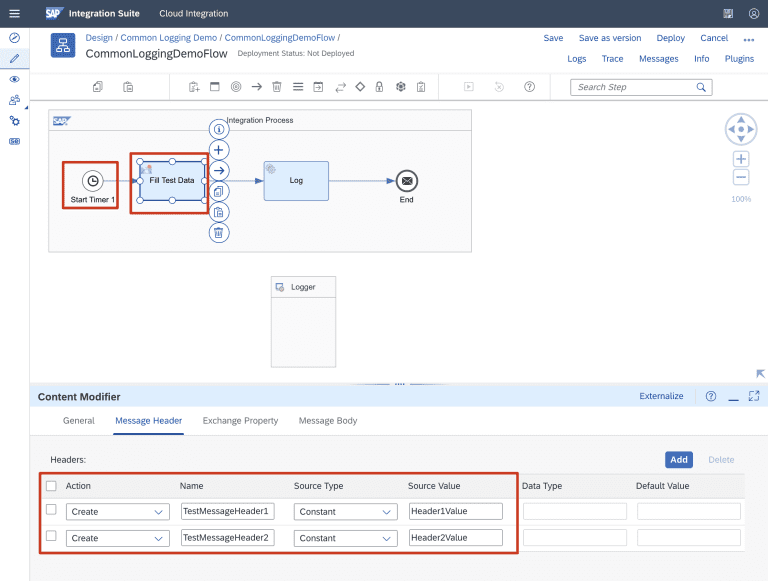
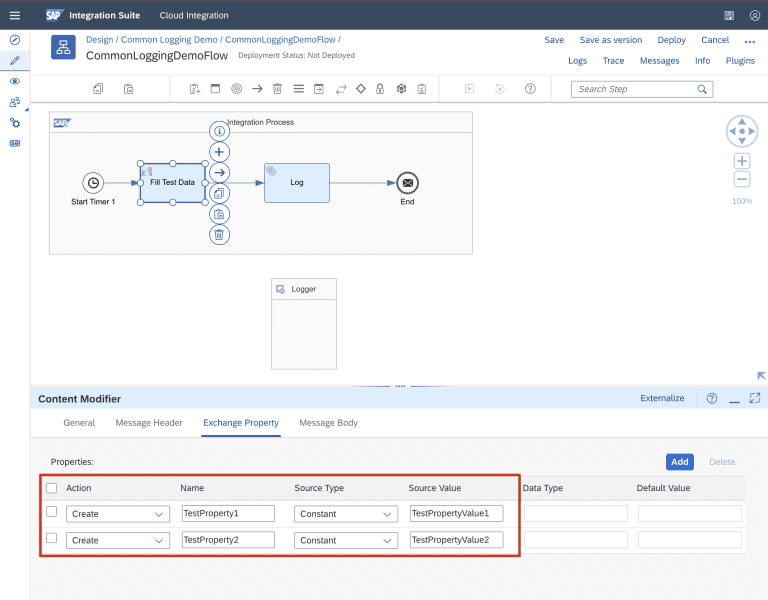
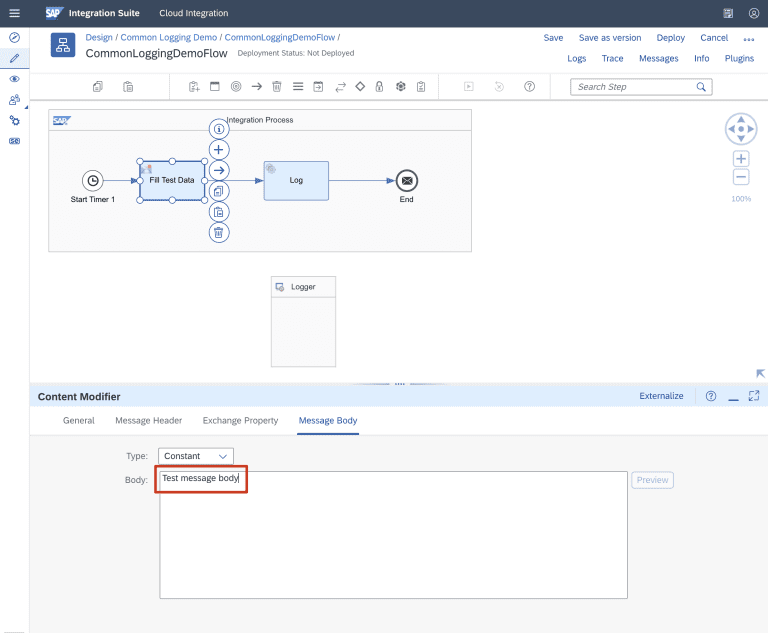
16. To facilitate testing, we will modify the start trigger for our iFlow to use a timer and populate test data with a content modifier.
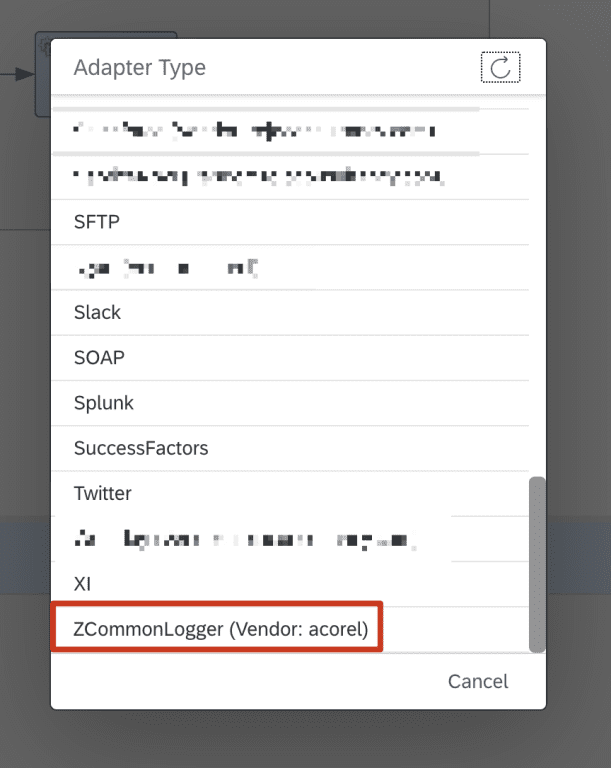
17. It’s time to use our adapter to log some data. Define a request-reply step and choose our adapter from the list.
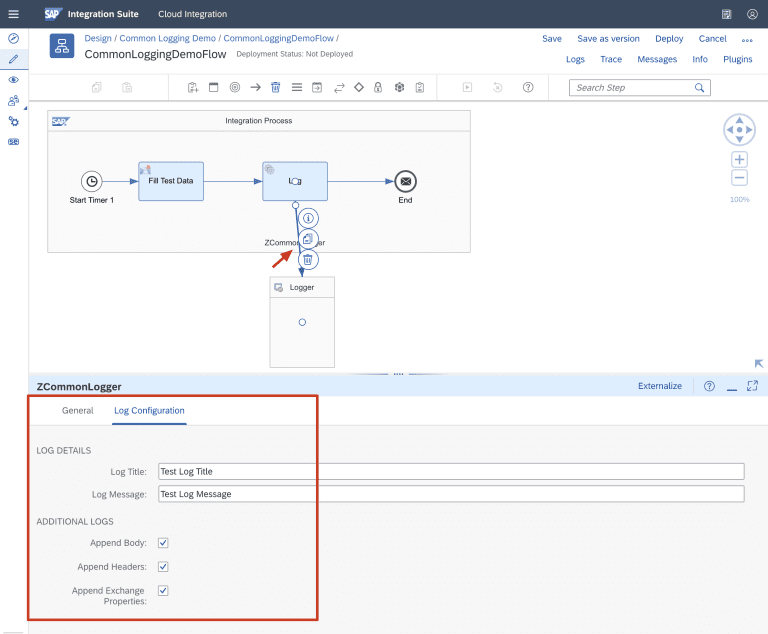
18. As you can see in the adapter configuration window, the design that we implemented in the metadata XML file is shown here. Let’s define the test log title and message, and select all additional log options as well.
19. We are all set for the proof of concept. Now, let’s save and deploy the integration flow.
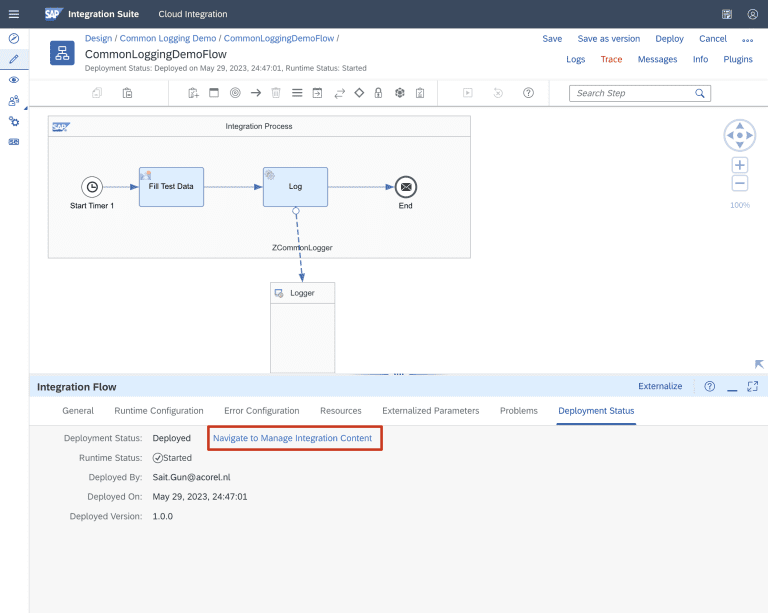
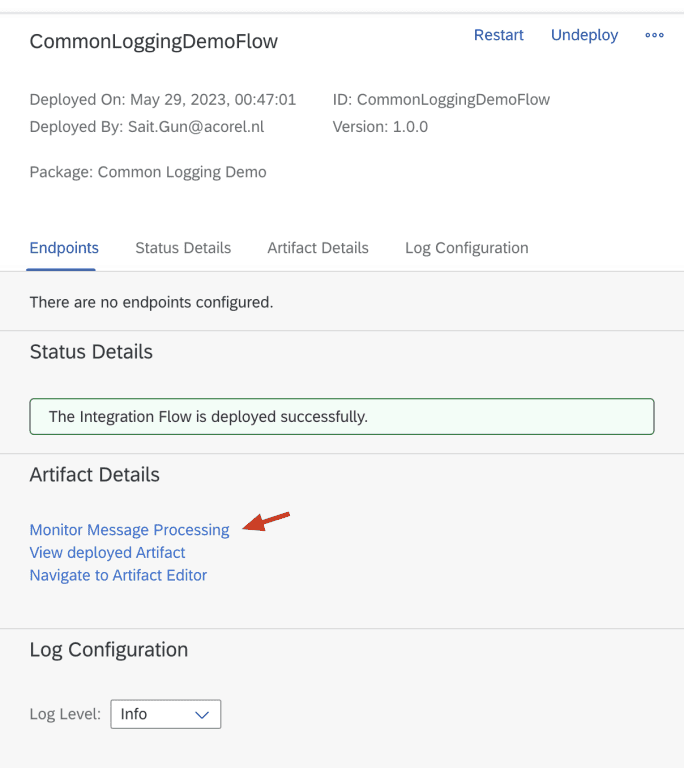
20. After the deployment is finished, the timer event enables us to view the test message in the message processing logs. As shown below, we can log a custom message, message body, headers, and properties without activating trace.
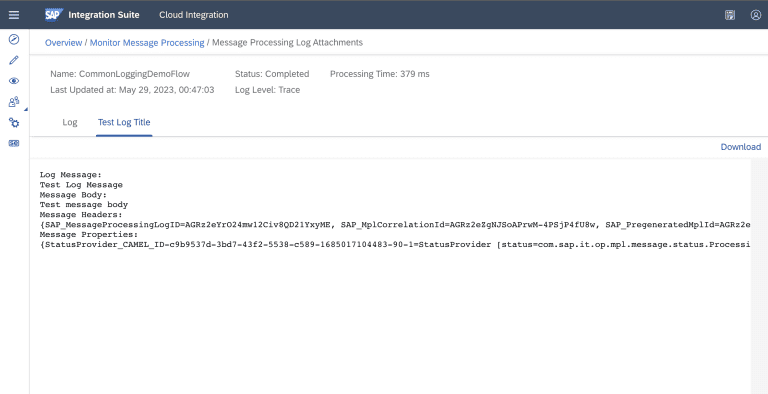
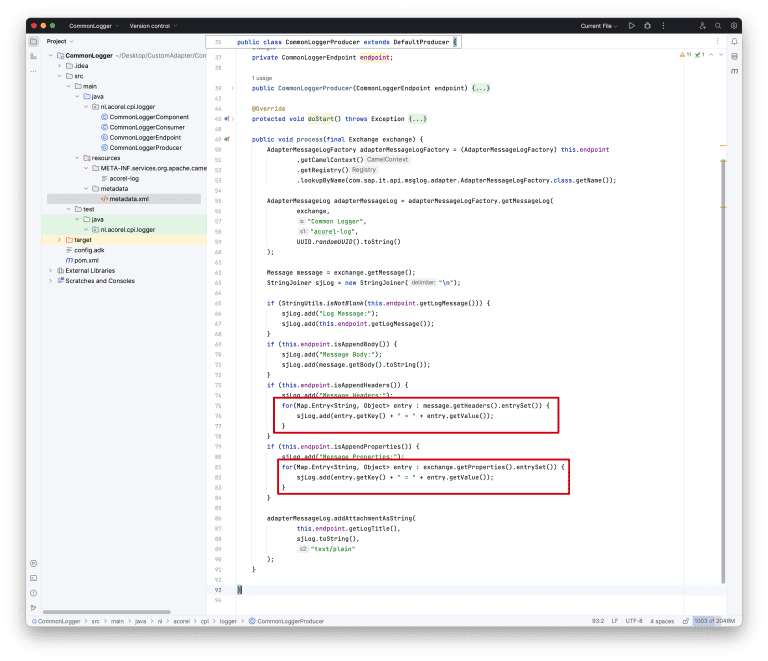
21. Everything seems to be fine; however, we realized that logging headers and properties in a single line makes it harder to read, and each value should have its own line. In this PoC, we only have one iFlow that logs. However, in reality, we could have over 100 iFlows that log headers and properties. We would have to modify all the iFlows just to adjust how we print the log. Fortunately, we are using a custom adapter for logging. All we need to do is modify the logging logic in the adapter’s code, as shown below
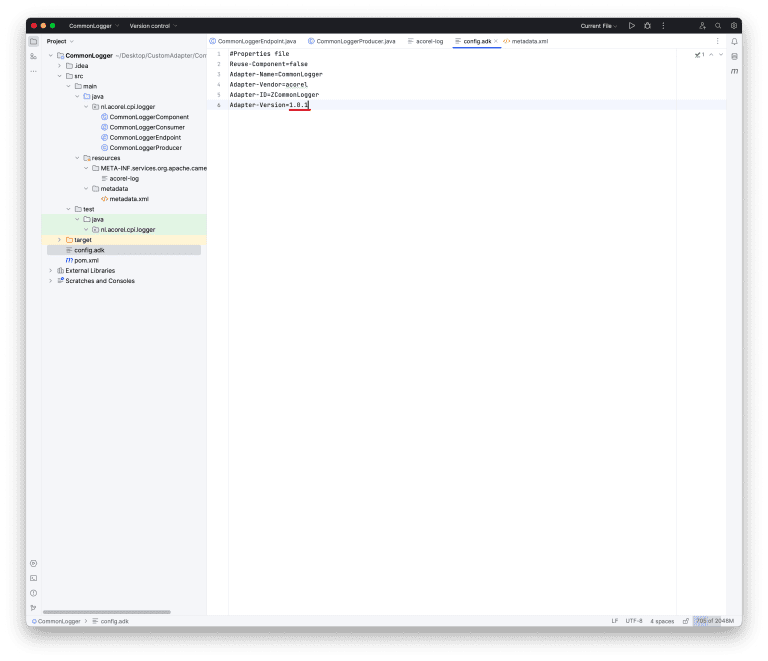
22. It is a good practice to increase the adapter version in the config ADK file.
23. Now we are ready to build the new version of our adapter. To do so, run “mvn clean install -Dskiptests” at the root of the project.
24. Upload the new version of the ESA file to the system as shown below.
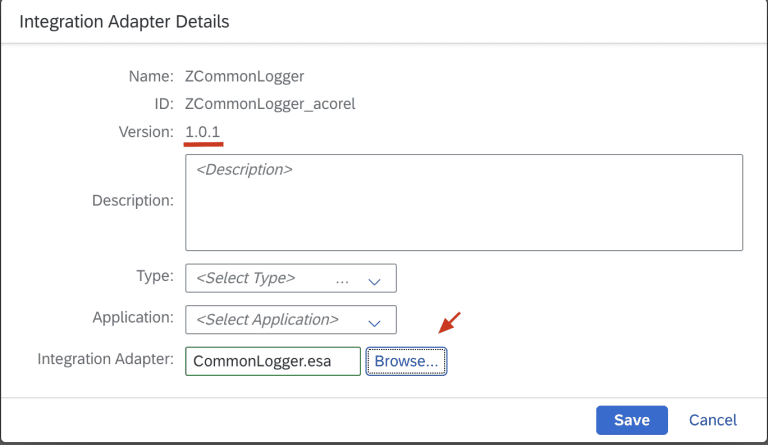
25. Do not forget to deploy the new version of the adapter.

26. To test the new version, we only need to redeploy the PoC iFlow.


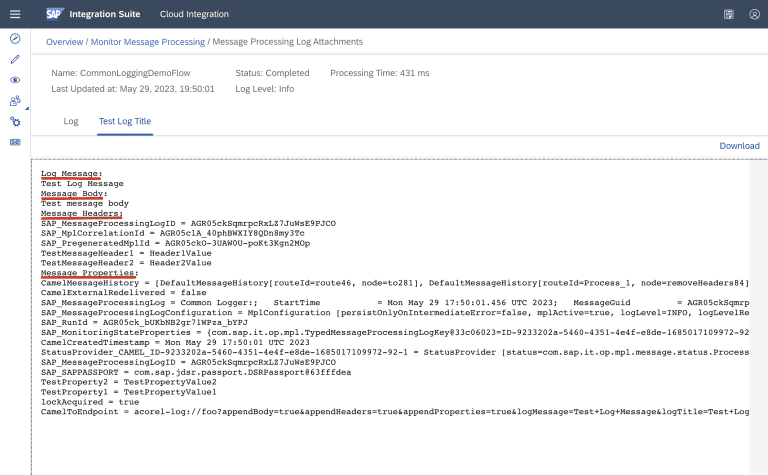
27. As you can see, we now have much prettier logs.
Conclusion
In conclusion, the challenge of effective logging in SAP Cloud Integration is far from a trivial one. The current methods each have their strengths, but also come with a set of limitations that can make it difficult to achieve a consistent and reliable logging standard across different projects. However, the utilization of a custom adapter in SAP CI presents a new avenue for overcoming these challenges.
The custom adapter solution we’ve proposed in this blog post aims to bridge the gaps left by existing logging methods. It provides a unified logging layer that is flexible, easy to implement, and capable of accommodating various data types without necessitating substantial coding effort from integration developers. While this is just a proof of concept, it hints at the potential of such an approach in real-world scenarios.
Receive our weekly blog by email?
Subscribe here:

